I'm making a lot of Christmas gifts this year, and one of my gifty projects is handmade beauty products. I've tended to spend a lot at Bath and Body Works, etc. for Christmas, so I decided to make some lotion, body spray, and lip balm so I can customize them. Here's a before picture of all my ingrediants.
So far, this project is going really well, so I should have some nice "after" pictures and some recipes to share in the next few weeks.
Last weekend, I had the pleasure of spending some quality time with some of my good friends at the home of T, one of my crazy nail polish lady mentors. She showed me some of her efforts at mixing her own frankenpolishes. I fell in love with this one, and it just so happened that I'd prepped my nails to manicure them when I got home. So, voila, my friend's franken.
This polish has a dark navy base with blue and iridescent small, square glitter. She told me what the polishes she used were, but sadly I don't remember, so we'll just have to appreciate the pretty.
And here's a close up, so you can see the lovely depth of the glitter in the jelly base. You can also see that my hands, particularly my cuticles, are still suffering from the neglect they suffered while I was doing transcription as a second job. However, I've been giving them some TLC, so hopefully they'll be recovered soon.
In hopes of making it a little easier to interact here on Digit Decor, I've made a few changes. First, I've installed a new comment system that will allow me to reply to each comment individually, rather than just adding a new comment to the post. It does require that you either provide an email address or use one of a number of sign in options, but it also means that you'll be notified when I reply (which I try to do for every comment!).
Next, I've set up a Facebook fan page for Digit Decor. You can like Digit Decor on Facebook using the button I've added in the upper right corner on this page.
We finally got around to watching the Green Lantern movie the other day, and I liked it. It didn't seem to get very good reviews from the comic book fan set (read: my people), so I wasn't sure what to expect. While it was a little light on plot, it did a good job of introducing the character and setting up a good villain for a theoretical sequel. So, while watching, I decided to do some GL themed nail art, and I did it gasp freehand (sort of).
I started with a base of Sally Hansen Xtreme Wear Emerald City on all my nails. This is a great, rich emerald green shimmer, which is very superheroic. In fact, I originally bought it to wear with my Robin costume. It applied a little patchy, so I used three coats to ensure maximum awesomeness.
For my accent nail, I used a notebook paper hole reinforcer as a template to paint the circle portion of the lantern. I put it in the middle of my nail and filled it in with Sally Hansen Whirlwind White, a great opaque white that I bought for stamping. I used the back end of a piant bruch to put a dot of Emerald City in the center (I really need some dotting tools), then used a KISS white striping polish to add the bars at top and bottom.
It's pretty simple and a little crooked, but considering my usual terror of creating designs freehand, it's not that bad.
Happy Thanksgiving to my US readers! I'll celebrate this holiday with a post about one that took place a month ago. Due to my previously mentioned second job travails, this is obviously way late, but I'mma post it anyway because the people have a right to know. About the worst. nail stickers. ever.
It looks fine from here.
Now you're starting to see the problem.
DUDE, what is on my nails?!
I picked up these Hedy's Body Shop Gel Nail Art stickers at Rite-Aid on sale a few days before Halloween. They have such a cute design and the moon and stars glow in the dark, so I was really excited. Sadly, there was nothing I could do to get them to lay down flat and stick. These pictures are after several layers of top coat. I ended up picking them off at a Halloween gathering later in the day after taking these pictures.
On the other hand, the base color, Confetti Conga Line, is great. It's a nice bright, balanced orange shimmer, which was very easy to apply. It did take three coats to be fully opaque, but I think that's reasonable in such an inexpensive brand.
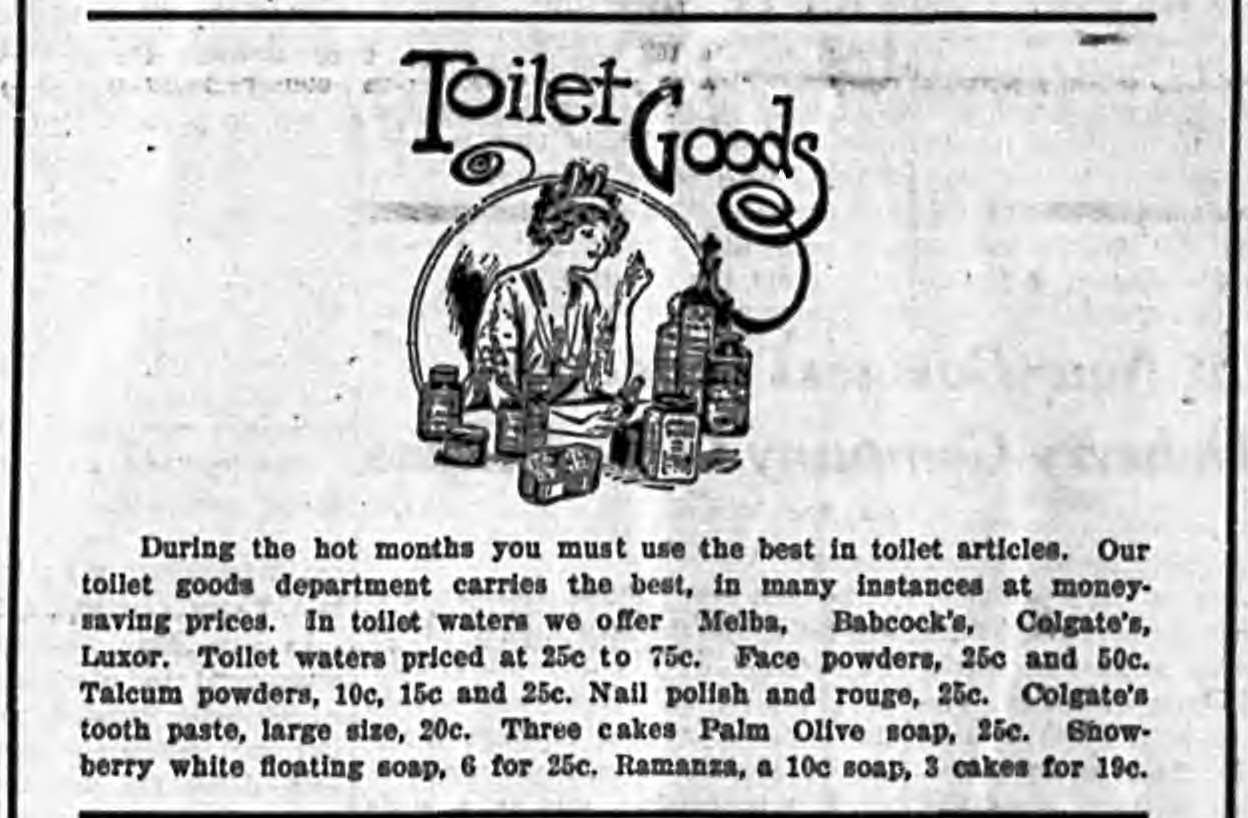
Today's nail history source is essentially the same ad that I included in my last post. I'm showing you this one because it advertises nail polish and nail rouge. Taken from the May 5, 1916 edition of the Banner, this is the earliest reference to using products to color the nail that I found in the local papers for the Athens, Georgia area. While this ad doesn't specify exactly what the product is, the common practice at the time was to use an oil colored with any of a number of red or dark pink ingredients to essentially stain the nail. After staining, the nails would be buffed or polished with the same mild abrasives mentioned in my first two history posts. This color only lasted a day or two, so it had to be reapplied often to maintain the look.
Click to enlarge
You can see the full page ad this was taken from here.
I was in the mood for something funky when I sat down to do this mani, and I decided to sort of recreate one that I remembered really enjoying in my pre-blogging days. Sadly, there was no sun to be seen when I wanted to take pictures, so these aren't that great. They're still pretty color-accurate, but I've got to start working on a way to take better pictures in the upcoming winter months.
Inside, no flash
For the main color, I chose OPI Fiercely Fiona, a greenish-yellow creme that a friend described as "pleasantly weird." It applied smoothly and easily, but is definitely a three coater.
Inside, with flash
For my accent nails, I used one coat of Fiercly Fiona, covered with two coats of Confetti My Favorite Martian. This polish has a lime green jelly base with bunches of same color...large shimmer? Small glitter? The finish looks sort of like a glass fleck, but the particles don't. It's pretty unique. It's also pretty sheer, which is why I used one coat of the creme underneath.
The final combination was really, really bright, which was a pleasant antidote to the icky, grey weather we were having.
Stephanie of Imperfectly Painted has is currently offering a very nice holiday themed giveaway. Stephanie runs a great blog. In addition to good polish reviews and swatches, she has a thought provoking Talk It Out Tuesday feature for bloggers (and others) to share their thoughts about polish and blogging. You should check out her blog and her giveaway.
This is a manicure I've had in mind for a while. The Princess Bride is one of my favorite movies of all times. It's one of the first movies I really remember seeing in the theater (as in the whole movie, not just bits and pieces), and I've loved it ever since. As a kid, I loved the pure, simple fairytale. As and adult, I get all the jokes and satirical parts that make it not just a pure, simple fairytale. I also love that, despite the satire and unlike the book it's based on, the movie and it's characters remain sweet and likable. I have a soft spot for all the actors in it, even the bad guys.
Since I'm not great at painting designs freehand, I had to get creative to do a mani in honor of The Princess Bride. The final product is maybe more inspired by than based on the movie.
I started with NYX Girls Pistachio, which is a soft sky blue creme. It has just a tiny hint of green in it, but that only shows up in certain lights. It applied very easily, but is a little sheer for a creme. I'm wearing three coats in these pictures to get full, even opacity.
Next, I used a teeny-tiny piece of make-up sponge cut into a rounded shape to dab clouds around the base and edges of my nail in Sally Hansen Xtreme Wear White On. I tried to make them thick and billowy at the bottom and thin out as I moved up.
Finally, I stamped a crown image from Bundle Monster plate BM08 on my ring fingers and thumbs in Sally Hansen Insta-Dri Silver Sweep. This is an absolutely great stamping polish, and I wish there was a similar gold in the Insta-Dri line. I'd like to point out that, while the cover art above shows a gold crown, it's definitely silver in the movie, which is why I stamped it that color.
Finally, if you've been so deprived as to be unfamiliar with this movie, check out this video. This is a fan made trailer, but the original trailer hasn't aged well. Actually, one of the reasons this movie wasn't originally a commercial success was the uneven marketing. If you want to know that that looks like, go find the original trailer. If you want to know what the movie is like, watch this instead.
First, some news. My recent unannounced hiatus was due to my being too overwhelmed with two (or three, depending on how you count) jobs. I've now quit one of them, which should mean I have more time to get back to doing my nails and blogging about it. Yay!
I was short on time and energy when I did my nails this time, so I just did a quick polish change and applied OPI Lucerne-tainly Look Marvelous!,which is a great polish with one of those awkward OPI names.
This polish falls somewhere between a foil and a glitter. Like a foil, the finish has a smooth, metallic shine; however, like a micro glitter, you can still see individual particles. The base color is grey and and it has both darker gunmetal particles and lighter silver ones. In certain lights, there are very, very fine pink and blue sparkles in there as well, but they don't show up most of the time. Compared to this year's crop of gunmetals, this has smaller particles and none of the hints of gold or other warm colors.
This polish flowed well onto the nail and was easily to control. It took three coats to eliminate all bare patches, but they were very thin coats. Dry time when finished with a coat of Out the Door was average.