Pages

Showing posts with label blue. Show all posts

Wednesday, September 19, 2012

Rococo Mani

All summer long, I've been craving sky blues. I want a truly sky blue polish, a blue that's soft and bright at the same time. I haven't found the perfect one yet, so I've been stashing any number of not-quite-perfect ones. It's a terrible affliction. ;)


The base color for this mani is Sally Hansen Smooth and Perfect Air. I stamped the pattern using Red Angel place RA-111 and Sally Hansen Gold Chrome, which is my favorite gold stamping polish. Finally, I added some pink gems for the finishing touch.

The overall design was inspired by the shapes and colors in French Rococo design. I'm thinking about starting a series of designs based on movements in art and architecture, but I've been so sporadic about posting that I'll probably wait until I'm doing it more regularly.

Like this.

Saturday, September 15, 2012

Across the Galaxy Part 2

As I discussed in a previous post, I'm on a quest to find a blue polish to layer with Milani Teal to recreate Deborah Lippman Across the Universe on a smaller budget. This is my second attempt at it.


The blue polish in this attempt is Ruby Kisses Regaled Out Blue, which looked like the perfect color in the bottle. For this mani, I used one layer of Milani Teal between two layers of Regaled Out Blue. As it turns out, Regaled Out Blue is a little too opaque and covered the colors in the glitter. Based on swatches online, Ruby Kisses Blue My Mind and Deal With the Devil are also candidates for this. Since Ruby Kisses is a low-cost brand, I may try one or both of those to try to close the gap to my dream polish.

Sunday, August 26, 2012

Starry Night Nails

For this manicure, I decided to try stamping in two colors at once. I've read various thoughts on how to handle this, but I basically just put each color of polish on a different part of the plate, scraped in the direction that would avoid smearing them together, and went for it.


 The base color is Cover Girl Rhythm and Blue, which I got as part of a two pack at the Dollar Tree. For the stars at the top of the image I used Sally Hansen Insta-Dri Silver Sweep, and for the grass at the bottom, I used Sally Hansen Color Quick Green Chrome. Sadly, the silver and green are so similar it's a little hard to tell the difference.


The image is from Red Angel plate RA-105. Again, I was a little disappointed to find that the details in the stars didn't stamp very clearly. To add a little more interest and cover some spots that didn't transfer well, I used my dotting tools to add some dots of Finger Paints Key to My Art to the stars. The final product reminds me a little of The Starry Night.

Vincent van Gogh [Public domain], via Wikimedia Commons

Wednesday, August 22, 2012

Sinful Sinful Colors

As many of you undoubtedly know, there has been an incident with Sinful Colors in which they used photos from nail blogs on some of their promotional materials without permission. In fact the photos in question didn't even show their polishes. Revlon, which owns the company that produces Sinful Colors, has apologized and states that they are working with the effected bloggers. I've decided that I'm going to hold off buying any new SC polishes for a while, but in the meantime, I'll still use (and post) the ones I had before all this came up.

That said, this is one that I was really excited to get in the late spring, since I've been obsessed with sky blues all spring and summer.


In addition to the sky blue base, Sinful Colors Cinderella has some pink shimmer that was tricky to photograph. It showed up more in real life. You can just get a hint of it on my thumb in this photo.

Thursday, July 26, 2012

Shawl Inspired Nails

I have to admit that I often dress to match my nails, not the other way around like normal people. However, there are some exceptional outfits that require a coordinating mani.


One of my friends knitted me this beautiful, light, soft shawl. We both love purple, and he started knitting shortly before I started crochet. So, we've been learning and sharing our work as we both progress in our skills.


To go with my lovely shawl, I chose two coats Maybelline Colorama Grape Crush for the main color and added an accent nail with two coats of KleanColor Vegas Nights over one of Grape Crush.


I felt like we needed another picture of the awesome shawl. I've been seeing people out and about where I live with an index finger accent nail. I don't know why, but I feel like it looks so different when it's just two nails over!

Any thoughts? What's your favorite accent nail? Or your favorite outfit to match your polish to?

Sunday, July 22, 2012

Summer Bright Water Marble

I've tried water marbling a couple of times before, and I have to say that I still don't have the hang of it. My biggest problem is that I end up with little dots where (I assume) there was a drop of water when I pulled my hand out of the cup. I'm determined to get this right some day, but sadly, today is not that day.

Left hand

I started with a base of Sally Hansen White On, then did the marbling with one drop Maybelline Colorama Cupid's Wing, one drop China Glaze Spontaneous, and two drops Sally Hansen Blue Me Away!. Cupid's Wing is a white shimmer, but it didn't show up much.

Right hand
 My right hand ended up with an interesting striped pattern. It's not what I was going for, but it looks pretty cool - it reminds me of Easter eggs. Since the shimmer in the marbling didn't show up, I decided to add a coat of Pure Ice Oh Baby! over the top. This was a fatal error. As you can see, it bubbled like crazy and didn't really add much shimmer. Grrrrr.

I'm not entirely certain what I'm doing wrong or if this is just a matter of practice. I would love some times from more experienced water marblers about how to make mine pretty and neat.

Monday, May 14, 2012

Inner Child Nails

I've been feeling a little down this week, so I decided to let my inner ten year old do my nails. Seriously, I had a bedspread very similar to this when I was that age.


The base color for this is Revlon Colorstay Coastal Surf. I've been wanting a bright blue like this for a while, but it chipped on the first day!  Boooooo! On top of that I put a coat of ELF Twinkle, which has tiny, multi-colored glitter in it that you can't really see in this picture.

Right side up
Finally, I stamped the two unicorns from Chez Delaney plate D10 using Konad Pearl White and added an iridescent jewel. In this next picture you can see the sparkles in Twinkle.

Bonus Background Cat!


What polishes does your inner child love?


Sunday, May 6, 2012

Across the Galaxy

Today's mani is my attempt to recreate Deborah Lippman Across the Universe using less expensive polishes. I'm not often tempted by higher end polishes, which for me means anything more expensive than OPI at about $8, because I don't feel like there's enough difference to justify the price point. However, when someone else let me use her Across the Universe, I loved it. I've been on the lookout for a way to make it happen that would be a little more accessible for me.


This is one coat of Milani Teal over one coat of Revlon Top Speed Royal. It doesn't show up as well in the photos, but in person it actually looked a lot like Across the Universe. The main difference was that it doesn't have the effect that the glitter is floating in blue that the original polish has.


On the other hand, the glitter is really, really close. I think if I had a nice, dark blue jelly to layer this between, it would be perfect. A little Googling has revealed that Ruby Kisses has a couple of dark blue jellies, so I'm going to try to stop by the local independent beauty store and look for some of those soon.

Friday, April 27, 2012

Geek Nails: Coin 'n Carry Edition

Today's mani was inspired by the new biggest source of not getting other things done: Coin 'n Carry (this is a referral link to note that I sent you). The premise of the game is that you're a shopkeeper, who needs to make money and increase the popularity of your shop. To do that, you play mini-games that reward you with resources you can use to make items to sell in your shop. The mini-games are quick and fun, and the shopkeeping requires a bit of strategy. So, best of both worlds. If my blogging pace slows down, blame this. Here's a short demo video.


And now, on with the nails. For each nail, I chose something from one of the mini-games to stamp on. I was having trouble making my pinky design show up, so I decided to go back over it with my dotting tools. Now, it looks awful. Seriously. Don't look at it.


The base polish for all my nails is KleanColor Blue Pearl. The stamp designs and polishes are:

Thumb: Crab - Fauxnad B78, China Glaze Aztec Orange; Crown - Bundle Monster BM08, Sally Hansen Color Quick Gold Chrome
Index: Strawberry BM05, Sally Hansen Insta-Dri Rapid Red
Middle: Diamonds BM09, Sally Hansen Insta-Dri Whirlwind White
Ring: Lime BM04, Revlon Top Speed Emerald
Pinky: Hearts and Clovers BM 03, Revlon Top Speed Bubble and Emerald; Stars BM14, KleanColor Neon Yellow


I won't explain what games these symbols come from; you should come play and find out. However, I do want to note that there's a crown on my thumb because I currently have the month's highest score in The Claw, which involves grabbing sea creatures out of the water. The crab gives you the most points, and I attribute my success to muttering "crab grab" under my breath while launching my claw at it.

So, if you decide to come play, leave a comment or email me at the address in my profile with your shopkeeper name so I can add you to my friends. Just don't plan on beating me at The Claw!

Friday, March 23, 2012

Bright Peacock Mani

Today's mani is an example of the whole being greater than the sum of it's parts.


I started with a coat of Nina Ultra Pro Blu Blaze, then topped it with two coats of Sally Hansen HD Spectrum. Both of these polishes are a little meh alone, but together they have a foil-like finish that almost seems to glow!


The final product reminds me of Orly Sweet Peacock, which I never picked up from the Birds of a Feather collection.

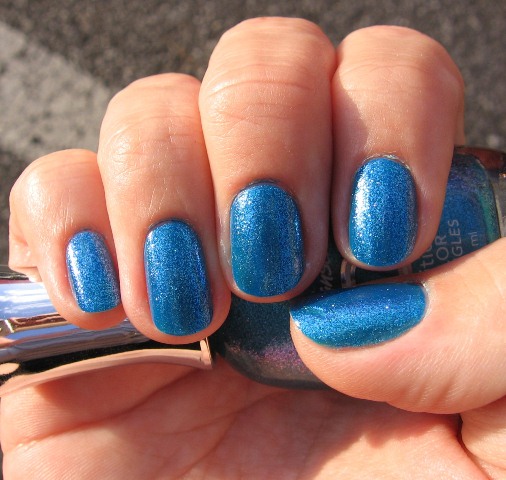
Tuesday, March 6, 2012

Star Sapphire Nails

I've been on a serious polish no-buy for several months, but my one indulgence has been three of the new China Glaze Magnetix polishes. I really hope the magnetic polish trend continues to pick up. First, I bring you Pull Me Close. I used the star pattern from the China Glaze magnet. I think the pattern will turn out crisper as I get better handling the magnet.


Sunday, January 8, 2012

Snow Flowers Mani

So far we've had a fairly warm winter here in Georgia. Last year, north Georgia had it's first white Christmas since 1882, but this year I haven't worn my heaviest coat once. While I am a southern girl and don't like too much cold, I do enjoy a little winter. So, this week's cooler weather has been a treat. January is our most likely time to get a little snow, so here's hoping.


The base color for this mani is Maybelline Colorama Glass Slipper, which is a pale blue with silvery shimmer. It's pretty translucent and the formula is thin as well, so I had to put on four coats. As I've mentioned with the other polishes in this line, I'm really okay with that given the nice color range and low price point (I got them in three packs for $1).

On top of Glass Slipper, I used white flower decals, which in this context really look like snow flakes. I wish I could remember what brand these are because they really work well. They're very soft and flexible, which means the edges never try to peel up. I think I remember where I bought them, so next time I'm there, I'm going to see if I can find another pack and make note of the brand.

Tuesday, December 6, 2011

Labradorite Manicure

I haven't seen very many reviews of the main polish in today's mani. I did see a few pictures of it way back around August, but I hadn't seen it anywhere in my town until very recently, when it showed up all of a sudden at Kroger.


This is Maybelline Express Finish Cool Couture, which is a medium grey creme polish with turquoise shimmer. The shimmer is very fine and a little shy in indoor light. So, inside it tends to blend into the grey and give the whole nail a slate blue color, which is pretty on it's own. However, in bright or natural light, the shimmer shows up. Then, this polish reminds me of the stone labradorite, as you can see in this picture. For my accent nail, I added one coat of an unnamed BonBons turquoise bar glitter. The color matches the shimmer in Cool Couture perfectly.


The formula on Cool Couture was a little tricky. It was a little thick and very patchy on the first coat. After the second coat, it evened out pretty well, but I still had a few bare patches here and there. With careful application, you can make it work in two medium coats; it just requires a little extra attention.


Finally, here's a bottle picture. The shimmer is a little more pronounced here than on the nail, but it gives you a good idea of the color. On the whole, I really like this polish. It's an unusual combination of colors, which I think is great for winter.

Monday, November 28, 2011

Polish Mentor Franken

Last weekend, I had the pleasure of spending some quality time with some of my good friends at the home of T, one of my crazy nail polish lady mentors. She showed me some of her efforts at mixing her own frankenpolishes. I fell in love with this one, and it just so happened that I'd prepped my nails to manicure them when I got home. So, voila, my friend's franken.


 This polish has a dark navy base with blue and iridescent small, square glitter. She told me what the polishes she used were, but sadly I don't remember, so we'll just have to appreciate the pretty.


 And here's a close up, so you can see the lovely depth of the glitter in the jelly base. You can also see that my hands, particularly my cuticles, are still suffering from the neglect they suffered while I was doing transcription as a second job. However, I've been giving them some TLC, so hopefully they'll be recovered soon.

Friday, November 18, 2011

Geek Nails: Princess Bride Edition

This is a manicure I've had in mind for a while. The Princess Bride is one of my favorite movies of all times. It's one of the first movies I really remember seeing in the theater (as in the whole movie, not just bits and pieces), and I've loved it ever since. As a kid, I loved the pure, simple fairytale. As and adult, I get all the jokes and satirical parts that make it not just a pure, simple fairytale. I also love that, despite the satire and unlike the book it's based on, the movie and it's characters remain sweet and likable. I have a soft spot for all the actors in it, even the bad guys.

Since I'm not great at painting designs freehand, I had to get creative to do a mani in honor of The Princess Bride. The final product is maybe more inspired by than based on the movie.


I started with NYX Girls Pistachio, which is a soft sky blue creme. It has just a tiny hint of green in it, but that only shows up in certain lights. It applied very easily, but is a little sheer for a creme. I'm wearing three coats in these pictures to get full, even opacity.


Next, I used a teeny-tiny piece of make-up sponge cut into a rounded shape to dab clouds around the base and edges of my nail in Sally Hansen Xtreme Wear White On. I tried to make them thick and billowy at the bottom and thin out as I moved up.


 Finally, I stamped a crown image from Bundle Monster plate BM08 on my ring fingers and thumbs in Sally Hansen Insta-Dri Silver Sweep. This is an absolutely great stamping polish, and I wish there was a similar gold in the Insta-Dri line. I'd like to point out that, while the cover art above shows a gold crown, it's definitely silver in the movie, which is why I stamped it that color.

Finally, if you've been so deprived as to be unfamiliar with this movie, check out this video. This is a fan made trailer, but the original trailer hasn't aged well. Actually, one of the reasons this movie wasn't originally a commercial success was the uneven marketing. If you want to know that that looks like, go find the original trailer. If you want to know what the movie is like, watch this instead.

Tuesday, August 30, 2011

Ancient Glamour Mani

One of my earliest serious career ambitions (after I finished the phase where I was going to be a policewoman/ballerina by day and Wonder Woman by night) was to be an archeologist. In particular, I have always been fascinated by ancient Egypt. I periodically go on an archeological documentary spree, which has been made infinitely easier since Netflix has quite a few that can be watched online. This mani was inspired by my most recent spree.


I started with a base of China Glaze Sexy in the City, a bright teal shimmer that tends more toward blue than green. This is a very vibrant color on it's own, and it reminds me of a greener version of Frostbite, one of my favorite China Glaze colors. The formula was unremarkable. I had no application problems, and it was opaque in two coats. You might want three to realize it's full color potential. The only downside to this polish was that is stained my nails something awful!  Be sure to wear a base coat to keep your nails from becoming a splotchy blue horror show.

Over Sexy in the City, I added a coat of China Glaze Cracked Medallion, which is a light bronze with metallic shimmer. I was expecting it to be very thick based on my experience with the other CG crackles, but in fact, it was pretty thin. I actually had to work pretty hard to get it on as thick as I wanted. Since I decided to apply it horizontally, instead of cuticle-to-tip, this was a little challenging. In the end it didn't really matter since part of the point of crackles is being a little random and messy.

As I'd hoped, this combination put me in mind of the colors and textures of tomb paintings and inlaid jewelry. So, I'll leave you with a related reading recommendation. His Majesty Queen Hatshepsut by Dorothy Carter is a fictionalized account of the life of Hatshepsut, possibly Egypt's only female pharaoh,* written for a young adult audience. It was one of my favorite books when I first read it in the fifth grade, and I enjoyed it very much when I read it again as an adult. It's quite historically accurate, and Hatshepsut is a very interesting historical figure.

*There were a number of other women who ruled Egypt as regents or queens, but Hatshepsut is the only one who is known for sure to have claimed the status of Pharaoh and taken on all of the titles and traditions that went with it.

Wednesday, July 27, 2011

Revlon Blue Lagoon

Surprisingly enough, I have another (mostly) unadorned polish look to share with you today. I did these nails while still recovering from the jet lag of returning from the west coast to the east coast, so I was looking for something easy and uplifting.


Revlon  Blue Lagoon is a sky blue creme base with super tiny particles of silver shimmer. I totally love this color, especially for summer. It looks like a beautiful sky, and I couldn't stop looking at my nails while I was wearing it. Unfortunately, the shimmer is only really apparent in bright, outdoor light, but when you do see it, it's gorgeous as well. This felt like such a light, cheery mani, I finished it up with a flower-shaped clear/silver rhinestone on my ring fingers.

I can't give a review of the application on this because I used a new base with it. Specifically, I used Seche Base Ridge Filling Base Coat. One of my nails was peeling a little, so I decided to use this to fill in and even things out. It worked fine for that purpose, but it seemed like it also stuck like glue to my polish, making it hard to get even coverage. I also got some bubbling that appeared 12 to 24 hours after I did my nails (you can see it a little on my middle finger). I have no way of knowing where to place the blame for that, so I'll have to wait until next time I wear this to find out. I really hope it's the base rather than the polish because I really love this color!

EDIT: Fortunately, I've since read on All Laquered Up that Blue Lagoon didn't bubble when ALU's Michelle tried it. I'm guessing that means I can officially blame the bubbling I got on the base coat. You can read the ALU review here.

Friday, July 8, 2011

Wonder Woman Manicure

This week, Sammy of Nailasaurus has been doing her nails with various fangirl themes for her Week of Geek. I seriously love this idea and all her designs. The first of her designs was based on Marvel comics characters. While I am nowhere near as good as she is at painting freehand designs, these really made me want to do comics nails of my own. Being more of a DC Comics girl, I decided to go with a Wonder Woman theme.


For my first three fingers, I started with a base of Sally Hansen Xtreme Wear Red Carpet. It didn't photograph well, but this polish is a cherry red jelly with lots of red glitter in it. It's sparkly, but since the glitter is suspended in the base, it's a subtle shimmer. The texture is a little thick for a jelly, which means it stays put and made for an easy application in two medium coats. For the tips, I used french manicure guides and Sally Hansen Color Quick Gold Chrome. This is a nice polish, but I did run into a problem with these tips. Since this polish is in a pen-shaped applicator, it starts out at the base of the brush. This made it a little tricky to get it spread evenly over a small tip and resulted in my tips being, well, lumpy. They're fine at a normal distance though.

For my ring finger and pinky, I started with China Glaze Frostbite, I've reviewed this polish before, so I'll just reiterate that it is great in terms of both texture and pigmentation. For this, I used three thin coats to get maximum color, but two would really be plenty. On top of Frostbite, I stamped stars from Bundle Monster plate BM20 with Konad Special Stamping Pearl White. Of the three Konad stamping polishes I have, this is the only one that really works the way I hoped it would. It stamped nice crisp images. Any blurring was the result of me using too much pressure.

As luck would have it, this was also the manicure I wore for the 4th of July, and it worked well for that as well. I'm currently thinking about some ideas for doing my own Week of Geek (really, it will probably my Geek Every Now and Then, Spaced Out by Other Things). I want to do designs based on Pokemon, Buffy the Vampire Slayer, Swamp Thing, a few other comic book characters, and the Princess Bride. I'm not really sure what I'll do for that last one, but it's been one of my favorite movies since I was 10, so it should be represented. I'm also adding a tag for "geek" which I'll apply to all the manicures that I do based on my fan obsessions.

Monday, June 27, 2011

Let It Rain Manicure

One of the amazing women I'm lucky enough to know got some good news last week. This manicure is a frivolous tribute, but she was in my head and heart when I did it.The colors I chose remind me of the sky during summer rainstorms.

The main color in this manicure, everywhere except my ring finger, is Zoya Dove. The formula on this polish was pretty good. It looked thin and streaky on the first coat, but became opaque and leveled itself on the second. It's thick enough to stay where it's put and dried pretty quickly. Dove is a light grey with with a slightly blueish tint. Despite the slight bit of blue, it's neutral enough to be very versatile.

My only complaint with this polish was the brush. It's very narrow and not all that flexible. This makes it hard to pick up the right amount of polish to get even coverage; it's either too much or too little. I ended up with pretty significant bubbling on my thumb, which I attribute to having to make about a billion strokes to cover my thumb nails.


For my accent nails, I used Sally Hansen Complete Salon Manicure Gray by Gray. This is a great polish; it went on smoothly and perfectly in two coats. The SH Complete Salon Manicure polishes have a big, thick brush, which I like. It might be problematic for small nails, but it's perfect for me. Despite it's name, Gray by Gray is definitely more of a slate blue. I finished my accent nails with a raindrop shaped jewel. Here's another picture that shows the raindrop right-side-up.

Wednesday, June 22, 2011

Summer Rain Mani

Almost completely by accident, today's manicure ended up being the exact opposite of my last one. I say "almost" by accident because my last mani included gold stamping using a Sally Hansen polish. This time, I wanted to try a similar Sally Hansen in silver to see how it worked. The long and short of that experiment is: Don't waste your hard earned cash on the Konad Special Stamping Polish in Gold or Silver. Gold doesn't work at all and Silver doesn't work well enough to be worth it. I haven't tried any of the colors yet, so I can't speak to those. Now onto the good stuff.

I started today's manicure with Essie Coat Azure from their Spring 2011 French Affair collection. Coat Azure is a medium, sky blue with a little bit of blue and white shimmer. This polish seemed a little thick going on, and after the first coat was streaky enough to worry me. However, with a second coat it leveled out very well and became completely opaque. The color is great; it's a really rich, summery blue that reminds me of the sky on a beautiful day. It's a perfect shade for summer when you want something subtle and not-too-bright. My only complaint is that the shimmer is much less obvious on the nail than in the bottle. Overall, though I'm happy with this one.


On top of Coat Azure, I stamped a concentric circle pattern from my Bundle Monster plates using Sally Hansen Insta-Dry Silver Sweep. I originally planned to use a different pattern from the same plate, but when I looked at this one, it occurred to me that it would look like rippling water in this color combo. Silver Sweep stamped perfectly and instantly became my go-to silver stamping polish (boo, Konad Special Polish). I don't have much else to say about that, except that it was hard to catch the cool look of this mani in a photo. The silver is so shiny it kind of blurs the pattern in a way that it doesn't in person.

In light of my dissatisfaction with the Konad stamping polishes, I'm curious about the warnings on their sight about not putting them directly on nails. Does any one know what might happen if I did? Or is it just that they're too thick to go on well?